2 The Roster tab
2.1 Manipulating classes
2.1.1 Adding and removing classes
To add a new class, navigate to the Roster tab and click the New Class button on the center-right of the window. Enter a name for the class in the box that appears, then click the OK button to create the class.
To remove a class, navigate to the Roster tab, then select the class's tab at the top of the window. Click the Delete Class button on the center-right of the window. Note that this will irreversibly delete the class.
2.1.2 Renaming classes
To rename a class, navigate to the Roster tab, then select the class's tab at the top of the window. Click the Rename Class button on the center-right of the window, then enter the class's new name in the box that appears. Click the OK button to rename the class.
2.1.3 Importing a roster
To import an existing roster to a class rather than adding students individually, navigate to the Roster tab and click the Import CSV button on the top-right of the window. Using the file selection dialog that appears, navigate to your roster file, select it, and click Open. A dialog will appear (Figure 2) that allows you to tell the application which columns contain the students’ first names, last names, birth date, section, and student ID. Of these, only the students’ first and last names are required.
After confirming that the correct columns have been selected, click the Finish Import button to add all of the students to your class.
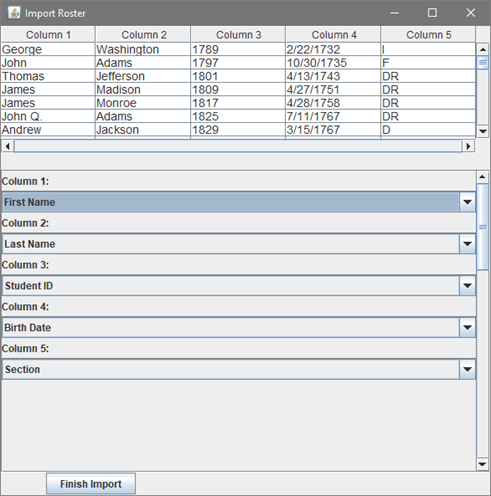
Figure 2
2.1.4 Exporting a class
To export a class's data to a CSV file, navigate to the Roster tab and click the Export CSV button on the center-right of the window. Use the dialog that appears to choose where to export the file, then click Save. The resulting CSV file will use the format shown in Figure 2.
2.2 Manipulating students
2.2.1 Adding students
To add a student to a class, navigate to the class in the Roster tab and click the Add Student button on the top-right of the window. Enter the student's information in the dialog that appears (Figure 3). After entering the student's information, click Save.
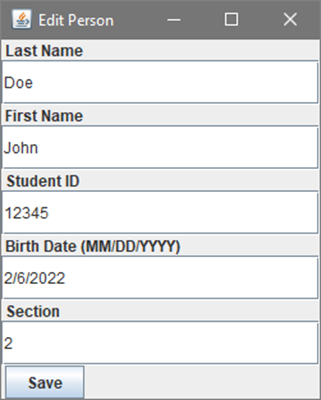
Figure 3
2.2.2 Removing students
To remove a student from a class, click on the student's name in the class's roster, then click the Remove Student button on the top-right of the window.
To remove multiple students at once, hold down the Ctrl key and click on each of the students you wish to remove. Right-click the selected students and select Remove students.
2.2.3 Editing students
To edit an existing student, double-click on the student's name in the class's roster. Alternatively, click the student's name to select it, then right-click the student's name and select Edit student. The dialog shown in Figure 3 will appear, filled with the student's information. After editing the student's information, click the Save button.
To add contact information to a student, click the student's name to select it, then right-click the student's name and select Contact information. After entering the information, click the Save button. Note that all contact information fields are optional.
To add notes to a student, click the student's name to select it, then right-click the student's name and select Edit notes. When you have finished, click the Save button.